Hello Strangers!
Kristin here! It's been a lonnng while since I have shared anything and I
am back with a doozy! You've been warned, this post is picture heavy :) My oldest daughter is
pregnant, so you know what that means...yes, I'll be a Nonna soon but
it also means we had a baby shower to plan! I am recovering from
surgery, so I knew I couldn't do it all by myself but luckily we rounded up plenty of help which turned out to be so much
fun! We really made it a family affair, with the help of LOTS of friends and family, so I thought I would share the event with you all!
They haven't picked a name yet, so "Welcome Baby Hughes" it is for now!
~Inspiration~
I always start with some inspiration, which in this case was my daughter and I sharing a brain. I had just bought my first scrapbook paper for scrapping the baby, which happened to have ducks on it, it was so cute (although it's discontinued, total bummer) Then, she had seen this Amazing Ducky Punch on Pinterest (source to be found
HERE), so there we had it, a Theme, DUCKS! I quickly came up with a color scheme and an Inspiration Board and we were on our way.
First action needed, the Invites! I knew I wanted to send an actual invite, yes I still buy real books
too. Mainly because I had envisioned something soft that reminded me of a baby, and let's face it, you can only get that point across with something you can touch. I fell in love with a pale yellow fleece for the ducks and the rest fell into place. The onesie seemed to fit and the blue and yellow theme was born. I needed to send 95 of these guys, so it had to be quick, not to costly and easy to assemble. As with the other elements, I made a template that marked the sizes and placement of everything, just so I wouldn't forget later but also so I could hand it off to someone to help if needed. These notes made it really easy for assembling later and cutting out all the parts was a breeze.
TIP: We had all the guests RSVP to email even though we were sending hard copy invites and I think it made it a little easier for everyone, not to mention we saved some money on the return postage for RSVP's.
NOTE for US viewers: If you have never mailed a wedding invite or what the Post Office calls "Puffy" envelopes, regardless of size, you should take the cost of mailing into consideration. If it won't fit in the slot because of width and you do not want it to go through the sorter due to it being fragile, it will be treated like a package and the cost goes up considerably. My PO gave me the option to send it via over-sized for (.65 cents) or as a package for ($1.90) and of course I chose the cheaper, I was sending 98 by the time we got to this point. I put an extra strip of packing tape over the address (due to the mini clothes pins on the invite) and about 10 were returned for lack of postage, they insisted on treating it like a package regardless of what my local PO said...so Beware and do your homework and then cross your fingers!
~Decorations~
Next step was going through what I would need for Decorations, Center pieces, etc. Let me tell you, my Cricut
more than paid for itself on this event. After the purchase of the
Life's a Party Cart, I was well on my way to cutting duckies galore!
TIP: for Cricut users, if you are cutting a lot of items and need to
remember many sizes, maybe even purchase coordinating papers to make it
all happen, test out what you need and write it down. The sizes
you'll need to cut, the settings on the machine, how many designs you'll
get from each paper, how many you'll need to buy/use and you will not
find yourself in a jam later when you are really warming up your machine
and putting it to good use.
Another TIP: Need to make your old cutting mat sticky again, go here, a great video on how to do it. There are a bunch of ways to do it but I love this one! http://youtu.be/iwdSypkCXdI
My absolute favorite part of the party was the soft yarns I chose for the ceiling in place of streamers and the tissue paper pom poms hanging from the chandelier. I am still drooling over how the yarn turned out. In the end, I know I will use it again, so for the money (about $4.00 ea.) the yarn was more expensive than the paper streamers but added texture, color and dimension and again, I know I'll recycle it, so I think it was worth it! The Tissue pom pom's for our get-together were borrowed but they are easy to make, see the instruction from Martha Stewart
HERE.
Banner- I made the Onesie banner you saw at the top of the post, that read "Welcome Baby Hughes", then strung the onsie's on yearn with mini clothes pins, it was super easy and cute. I could have made it more complex but considering it was pretty light and we couldn't get it to stick until we worked some magic, I'm glad I left it where it was.
TIP: Command hooks and some alcohol make it easy to hang anything, anywhere without damaging a wall. SO if you are in a rented space, check em' out HERE, they have lots to choose from. Clean the wall with a touch of alcohol to get off any oils or grime and they stick really easy to nearly any surface.
Garland- I must have cut about 300 6" ducks and onesie's to sew together to make garland for the windows and around the room. The cutting took most of the time, sewing them was a breeze and really kinda fun to see them all strung together. Most of the paper was Echo Park, Little boy collection, found
HERE. *See pics above.
Tables- These were a shared thing with two of my daughters awesome friends. We had a perfect Blue fabric for the tables, a 12" fleece ducky in the middle and then gorgeous sunflowers or ducky baths with floating ducks and bubbles as the centerpieces. I did 3 snacks per table, in clear short vases from the Dollar Tree, which kept the guests happy. We topped it off with a few assorted colored rubber ducks on each table and the game pieces as table settings. The table settings were one of the best ideas I had. I designed all three game pieces to look nice and go together and preset them as a table setting, so there was no need to hand out anything after guests arrived. Since we had so many people coming, our worry was lines looking like Disneyland and irritated guests. The presets gave everyone something to do while they were waiting for the line for food to go down or until it was their turn at the photo location. The other two things on the tables were reminders disguised as ducks. One was a small mason jar, washed with Mod Podge and paint (another version of this can be found
HERE), in baby blue or ducky yellow that had either nuts or M&M's in it to hold a wooden dowel attached to a 8" duck reminding guests to stop by the photo location and to turn in their diapers for a raffle ticket. Our goal really was to communicate with the guests as much as possible and with so many people, we knew this would be hard, so these communication reminders really helped us get the word out! And lastly, I created a card, that told them how to use everything in front of them, it went over the type of bingo we played, where the wishing tree was located and reminded them they could win great prizes. *See Games below for pictures.

Wishing Tree- In the table setting was a 6" ducky or onesie for guests to fill out, wishing the parents well wishes and greetings to baby Hughes. Again, this gave the guests something to do and will be a beautiful addition for a memory book for my daughter. The tree itself was branches actually donated from a family friend who is a florist. I gave it a coat of white paint, added some turquoise glitter, shoved it in an old pot, held down by river rocks and wrapped a piece of Burlap over it once we got it set-up. Some glass pebbles on top of the river rock and we were set.*See pics above.
Diaper Cake- Mine was a monster cake, I had purchased a bunch of stuff I thought would match the baby's room and things I knew she needed, so it quickly became the leaning tower of diapers vs a diaper cake. One thing I did get lucky on was finding the blue Levi's like and blue Camo like diapers that matched our color scheme, so it was all built off of that and the baby's room. I found a "How To"
HERE that I used the first time I made one and it's great but there are many cool ways to make these and so many different things, like tricycles and strollers and I'm sure many more. Overall it was a fun way to relieve stress in the middle of all of this craziness.

Candy Giveaway- We also placed a glass jar of candy of each table and placed a small blue ribbon under one chair at each table, so 1 guests at each table got to bring home a glass vase. * Originally we planned to do the guess how many candies in the vase and win it but in the end, we opted for the easy game that we could set up ahead of time.
The Photo Location- Holy cow, this was awesome and a huge undertaking! My younger daughter had seen something like it, we looked at pictures, picked out paint based on the two colors I had used for the invite and my husband helped build it. My daughter did a great job with the stripes for this color scheme and we know we can repaint it and use it again for another party, so the hard work was worth it! It has very few parts, the legs can be attached at the location, so it travels well and people LOVED IT!! It kept people entertained, it was a great way to ensure my older daughter (the guest of honor) was able to greet and chat with every guest and gave us many cool pics for later. The plan was, have everyone take a picture with my daughter, print all the pictures at the party and then attach the pictures to pre-signed, handwritten, Thank You card that was attached to the Thank You gift. If the printer was faster, it would have been perfect but in the end, we only had about 15 out of 95 pictures that had to be mailed or hand delivered after. It also made life easier for my daughter who now doesn't have to send buckets of thank you cards. Of course she will spend some time thanking people individually and family for big gifts but this got a bulk of that worry out of the way for her, so she can focus on the baby coming :) My younger daughter took the pics, off of my Canon, EOS digital which sat on a tripod and we just swapped out memory cards for printing. We had half of a cheer squad there helping with pictures and handing out gifts and have so many fun pictures to sort through and scrap now :) Some of my favs are below.
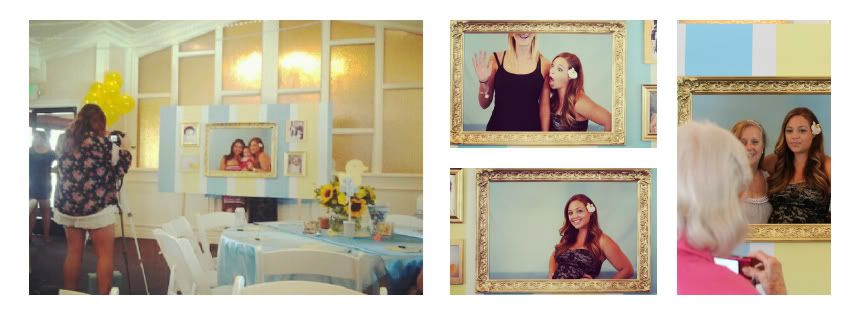
My younger daughter on the right, the guest of honor and mommy to be on the bottom right in the middle. My MIL on the far right, snapping a pic for herself of her daughter and granddaughter :)
~Gifts~
The Gifts for games and the diaper raffle we very fun to put together! Themed to a "Bubble Bath" or "Spa Day" to match everything else, I tried to think of what I would want in a pampering kit. I ordered nearly everything off of the internet since I was recovering
which really turned out to be a great help. I got awesome prices from
whole-sellers on almost everything and never had to go to three stores
just to get enough of what I needed. I did however have to plan ahead
and leave time for delivery but in the end when I was ready to start
assembling, it was all there sorted by element and ready to go. I recycled baskets I had, ordered a combination of one-off's on Etsy, some luxury items from bath stores and threw in some Dollar Tree items like nail files and candy where I could. Half had wine or Champagne, all had some sort of bath salts or fizzes, sponges, lotions, nail polish, scrubs, and candy. In the end I shrink wrapped them for easy travel, and that saved me! If you haven't used it, I highly suggest it. It's just cellophane that once heated, molds to your item, it makes wrapping odd shaped things a snap!

Thank You gifts, keeping in theme with the ducks and bath time, our thank you gifts were a bottle of bubble bath, with a unique label, a yellow shower sponge, some vanilla pear bath fizz and a mini duck for color. The colors worked great with our theme. Putting together the gifts, I used a bubble bath that was $2.97 a bottle, which in turn filled 7 of our 8oz. bottles, the sponges were .39 cents online by the time I bought 100, the bags and ducks were bought in bulk as well, so it was a fairly cheap way to say thank you to 95+ guests. Labels can be bought in all shapes in sizes these days and I searched the internet for a nice poem and just altered it a bit.
~Games~
Probably the most time consuming thing was working out the game pieces for what we were playing. My daughter and her friends had strong opinions on what they wanted to play and what they didn't and since they go to baby showers every weekend nearly, I was on board with whatever they thought. We were going to have a lot of people, since we were combining the family and friend shower into one, so I knew we needed to be efficient. That lead me to the table setting I talked about above. It really worked, it kept them entertained from the beginning and made our lives easier.
Bingo- We played the type of Bingo where you hand out a piece that has blank spots and the guest/player fills in what they think the recipient will receive. It works for any kind of party and keeps the guests busy because the game is played as gifts are being opened at the party and allows you to use it as a reason to give away something and share the love:) This also makes it much easier than creating 80+ unique bingo cards, trust me on this one!
How well do you know blank- A simple 10 questions on how well do you know bla bla bla.
Diaper Raffle- I made a diaper raffle ticket because I wanted to, but you could also buy tickets at the Dollar Tree and .99 cent stores these days. I had the guest fill out their name on the back as I traded them for their diapers. I'm pretty sure my daughter is set on these for while :)
*TIP: for receiving several sizes of Diapers, create a Diaper Raffle!
In the invite, I added a card that broke up how many people should bring a certain size (if you invite 30,
break up three sizes by groups of 10) suggest if people would like to
participate in the raffle, they should bring the size noted on their
invite only and of course offer awesome Raffle gifts!
~Food~
I am so bummed, we all forgot to take pics of the food and drink tables, I know, go figure! We opted to have a taco vendor come and do the main course, so we had platters of fruits and veggies with hummus for starters and then the most amazing desserts by my daughters future MIL, from cupcakes to this cool whip thing, it was all Incredible! I was able to do Cupcake wrappers from the cricut to match the theme and also cut out ducks and glued them to bamboo kabob sticks to poke into the fruit, veggies and cupcakes with tyes of fruit, flavors, etc. Of course we had the Ducky punch, lemonade and ice tea as well as sodas for drink options. I did snag a few pics of of Instagram, see below.


Lastly, let me say after planning events for years and learning from many awesome people and from my own mistakes, BE ORGANIZED! Plan, plan, plan! Be realistic in your brainstorming, write down your thoughts and MOST importantly, MAKE LISTS! Lists about lists, Checklists, shopping lists, Reminder lists, anything and everything you can write down will save you later, be it on a notebook, shopping bag or napkin. Your cell phone or tablet are great places to make lists because you can bring them with you on the go, or create an Event Book like I do. Whatever works for you, just Write it Down!
If you've made it this far, I owe you some bubble bath, lol. Thanks for reading my novel, I hope you enjoyed seeing our day, it was very special...and Exhausting!!
Hope to share again soon,


