


Happy Halloween everybody! We were so glad to have so many people visit us for the blog party on 22nd October :) and now it's Halloween we can announce the four winners! There were four sets of goodies to win, and our four winners are:-
Magaly Guerrero said...
"It wouldn't be Halloween without' Witches, of course! Can you imagine the dullness? And not cackling. What kind of All Hallow's Eve would it be without cackling? Happy Fanciful All Hallow's Eve!
OCTOBER 22, 2011 5:28 AM
Kelly Jeanette Swift said...
It wouldn't be Halloween without a little fright. It fun to have a good scare.Happy Halloween!
http://kellysalteredart.blogsp
OCTOBER 22, 2011 8:25 AM
Maggie said...
It wouldn't be Halloween without my niece giving me all of her Reese's peanut butter cups!
OCTOBER 22, 2011 7:46 PM
Jennifer said...
Wonderful post! I loved it! So creative and sweet! I must say "It wouldn't be Halloween without the Halloweentown movies on the Disney channel!"Happy Halloween!
http://broomsticksandlace.blog
OCTOBER 23, 2011 8:38 PM
Congratulations winners and thank you everybody for sharing your Halloween must-have's with us - we really enjoyed reading them all and visiting your blogs too!
Winners please e-mail your contact details to thescrappytree(at)hotmail(dot)com and we'll send your treats out very soon.
Happy Halloween everybody!
The Scrappy Tree girls xx
Monday, October 31, 2011
Halloween Party Giveaway Winners!
Sunday, October 30, 2011
Happy Halloween Party! PART II
Happy Halloween Everybody !
Now, welcome to part II of my Halloween Party prep and projects


My major projects for this year were the two pumpkins (orange and black) made from one fake carvable pumpkin I cut in half and sprayed with glitter. Last week I showed you the black one, this week, the star is the Orange one, top right. Complete with an Evil looking tree, a witch flying over the moon and some spooky jack-o-laterns next to a gravestone. All the items are added by being glued to black painted kebob sticks, that I then stuck into the pumpkins soft surface. In the bottom right picture, you can see some of the ATC's I traded with some friends for Fall/Halloween, they are super cute!
Next up is the Happy Halloween banner. I chose Martha Stewart papers, black, ivory and natural burlap as the bases and some misc. embellishments. Again Michaels had these cool skeletons on twine that I just stretched out, added a quick twine extension to and used as my banner base. They also had some awesome looking fake barbwire, that lines the front of the banner. All or most are hot-glued in place. The letters are just inked with 3-4 distrress ink Halloween colors.


Below: Some of my favors and treats this year for the neighborhood kids that alwasys stop by. When we have a party these work for party displays or as favors. All of the pine wood and bolsa wood boxes and such Michaels craft stores offer every year are very economical and make great ways to be creative. They also make awesome and cheap ways for the kids to create some Halloween magic of their own. These lovely trinkets are for all ages, all you need is a little seasonal candy and some craft paint to dress them up!

My favortie thing to make for a large party is a Homemade brew of some kind. Enoy this Home-made apple cider that warms the heart and is always a hit!

Ingredients
o 8 -10 apples ( I used gala for a less tart or intense taste)
o 1/2-1 cup sugar
o 4 tablespoons cinnamon ( or 4 cinnamon sticks)
o 4 tablespoons allspice
Directions
1. Quarter your apples (no need to remove peel or seeds).
2. In a large stock pot add your apples and fill with water--just enough to cover the apples.
3. Add your sugar.
4. Wrap your cinnamon and allspice in a doubled up cheese cloth and tie, and add this to the apples and water.
5. Boil on high for one hour (uncovered) checking on it frequently.
6. Turn down heat and let simmer for two hours (covered).
7. Take off the heat after two hours of simmering and let cool.
8. Remove spices and mash up the apples to a pulp like consistency (a potato masher works well for this).
9. Once cool pour into a strainer over a large bowl. When most of the juice has drained away, put the remainder of the pulp into a doubled up cheese cloth and squeeze over the bowl until no more juice comes out.
10. (At this point you can either restrain the juice to get out the little bits of pulp that remain with a cheese cloth draped inside the strainer to catch them or just leave it like I do).
11. You can store in an air tight container in your refrigerator for up to a week or you can freeze it for later use if you like.
12. Reheat in the microwave or on the stove and enjoy either plain or you can add caramel syrup or caramels, whipped topping with cinnamon or, like my neighbors did if you like it really sweet, with marshmallows or marshmallow creme.
13. also you could make this a diabetic recipe by omitting the sugar and adding diabetic sweeteners to taste in place of the sugar or none at
A few other favorites are roasting pumpkin seeds and making popcorn balls, my Mom made both every Halloween! See the links below for some simple receipes.
How to make Popcorn Balls-

How to roast Pumpkin seeds-

Lastly, my favorite kids game for every Halloween. Even if we don't have a party we set this up so the local neighborhood kids can come and partake. It's amazing how many come back year after year! Google Halloween mad scientist or Hallween body parts game for complete details. See mine below!

The way it works is, you need as many covered boxes as you will have body parts (I found these work best) Decorate/wrap the boxes, leaving a hole in the top of the box, that can be punched out or cut open slightly (see samples above). The trick is a DARK, spooky room and a good hostess, willing to play into the game. I use my hottub covered in white butcher paper with body parts hanging from the ceiling, squishy eyes and fingers on the table and a witches cauldron with dry ice, lite slightly for the center piece. Lay your boxes on a table, high enough that doesn't allow them to see into them(the dark helps with this), but low enough they can reach into it and feel around. Each fake body part that resembles a real body part goes in a box. We have the hostess read the poem on the boxes and only take one child at a time to each box. A flashlight is also a fun spooky accessory, either the hostess or the kids can use. You can get really creative with this one and if you do it year after year you have to because the kids catch on after awhile.
Some my favorties to use are:
Cooked spaghetti noodles oiled slightly for- the worms
Corn husk for: the hair
End of a pickle spear for: the nose
Hot dogs with almond slivers for: the fingers
Jello mold for: the heart
Frozen peeled grapes for: the eyes
uncooked popcorn for : the teeth
You get the idea...
Think textures and try them yourself. Have Fun!
Here is a link to some good text and food ideas; http://www.suite101.com/article.cfm/food_crafts/80790
Well that's about it for my Halloween Party this year, hope you enjoy yours!
Again...Happy Halloween!
Thanks for visiting and
Don't forget to stop by later to see the 4 lucky winners!
Don't forget to stop by later to see the 4 lucky winners!
Cheers,
Kristinxx
Pumpkin carving fun!
This year, as we have no kids to trick or treat with, we decided to have a pumpkin carving party on the weekend before Halloween for all the big kids instead :)
We made little pumpkin carving kits, with tools and sustenance for the hard times ahead...


Of course some people also liked to make their own patterns too :)

Happy Halloween!
Gayle xx
Friday, October 28, 2011
October's Art Journal Friday
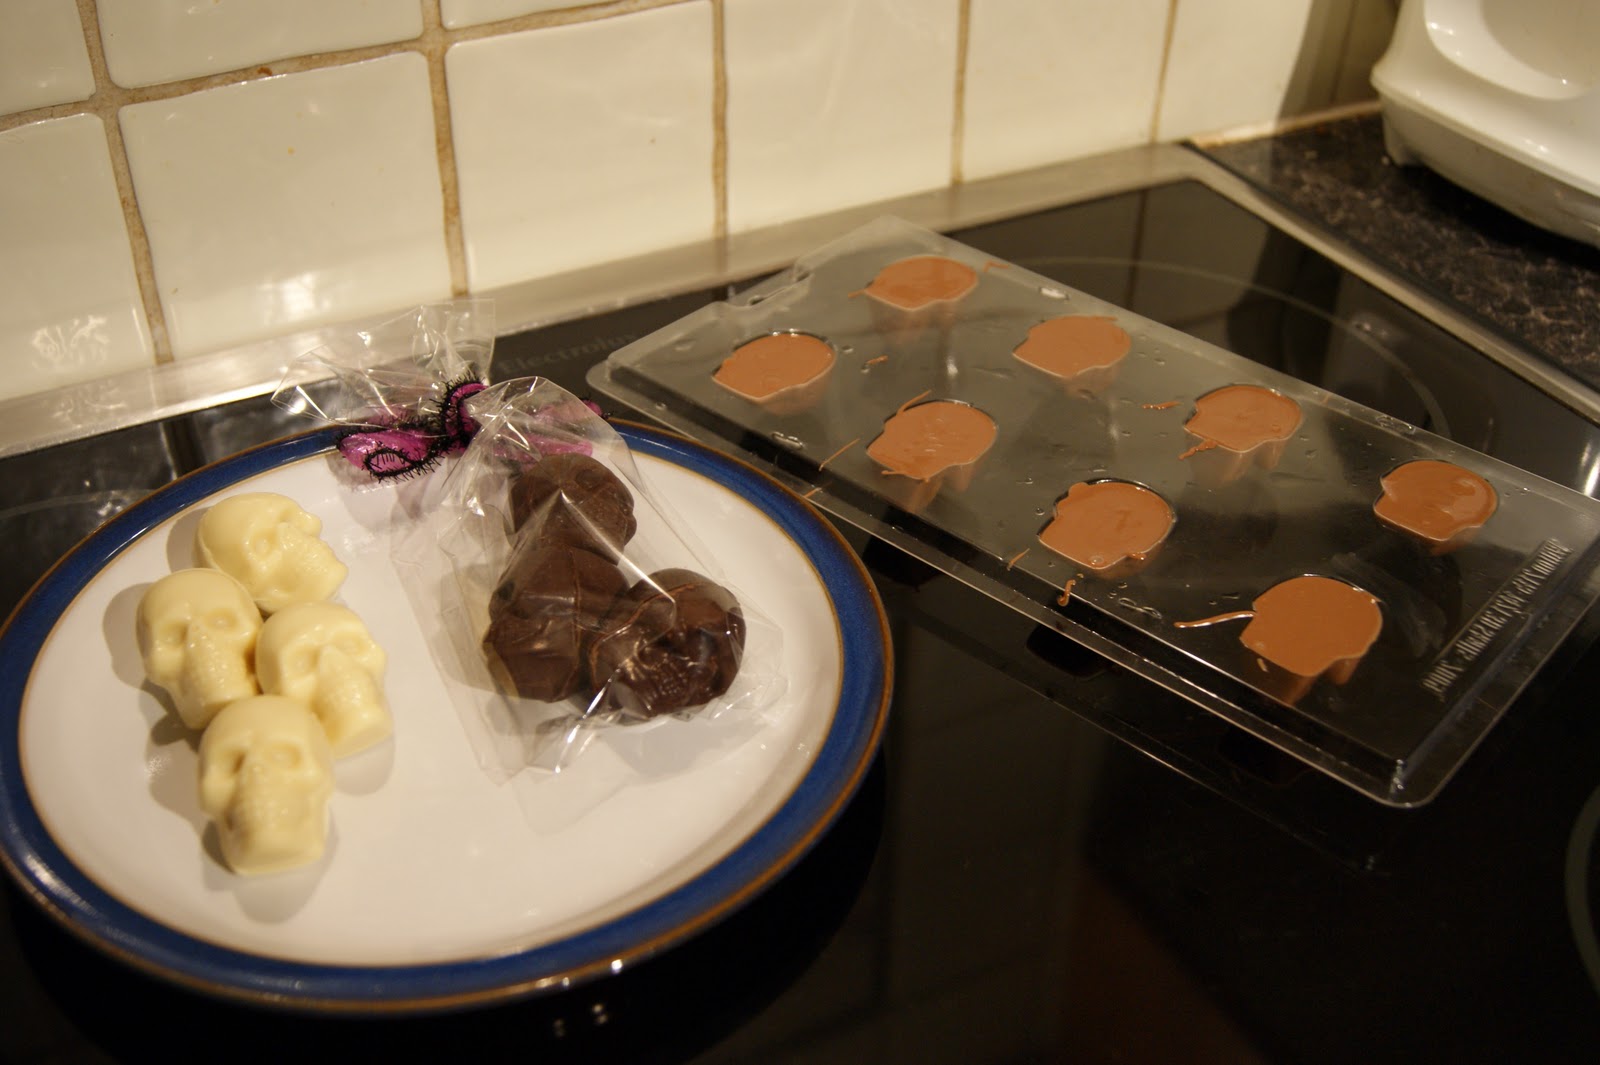
Welcome to October's Art Journal Friday! The weather is getting more crisp by the day and we're fast approaching the fun that is Halloween :) I've been busy putting up a few decorations ready for our pumpkin carving party tomorrow...

..and been making a few chocolate skulls for our guests too! :)
Of course I'm also hoping to get scrappy this weekend also, and some art journaling would certainly be top of my list for this weekend :) if you haven't played along with Art Journal Friday before, we pick a new theme on the last Friday of every month to inspire you to create a page or two over the coming weekend - there are no rules here, you can use whatever medium makes you happy and we love to see your pages if you like to share them; just leave a link to your page in our comments section and we're happy to come visit and leave you some love :) come one come all, if you art journal all the time or you've never tried it before, have some fun experimenting!
This month's theme is... Something Wicked This Way Comes! This might conjure up fun Halloween memories for you, or remind you of a scary film you couldn't bear to watch more than once ;) it might be time to explore your naughtier side, or to indulge in some journalling about your deepest fears...
Get journalling this weekend!
Just to remind you , today is the last day to enter our Halloween party giveaway; if you'd like to enter please leave a comment on this post - we'll be announcing the winners on October 31st - Halloween!
Happy scrapping!
Gayle xx
Thursday, October 27, 2011
Halloween Mini Album
Hello, Diana again, this time to
share a Halloween mini album.
I normally don’t purchase mini
album kits because I like to make my own, but I just could not resist the
cuteness of this one, designed by Ronda Palazzari and sold at Cocoa Daisy. I
did make a few changes on my cover, thanks to all the goodies that came with
the kit I was able to over embellish the way I like to J

The My Mind eyes Mischievous paper
is so nice, I find that little scarecrow witch and owls very cute and the color
combo on all the collection is amazing. The Flocked Web Transparency is from Fancy Pants and the Sheer Tab Album from Maya Road.

For the inside pages I took a little from the original design and combined it with my own style, this is my cover page that also has the title of the album.

And here are three of the pages I
made.


Happy Halloween!!!!
=Di
Wednesday, October 26, 2011
Day of the Dead!
Her face is unforgettable and she goes by many names:
Fancy Lady, Skinny, Bony, and Baldy. A fixture in Mexican society, she's not
some trendy fashion model, but Death (La Muerte).

La Catrina by Mario
López Torres
Hello, Diana here to share
a little bit of one of my favorite Mexican traditions: Dia de Muertos, which is
celebrated on November 2nd.
Every year The
National Museum of Mexican Art in Chicago opens a beautiful exhibition about the
celebration, on this post I am including photos I took during my visits from
this year and last year, forgive the bad pictures but most of them were taken
behind glass or without flash.

Photo from the Museums web page
A Little bit of the
Traditions History
More than 500 years ago, when the Spanish Conquistadors landed in
what is now Mexico, they encountered natives practicing a ritual that seemed to
mock death. It was a ritual the indigenous people had been practicing at least
3,000 years. A ritual the Spaniards would try unsuccessfully to eradicate. A
ritual known today as Día de los Muertos, or Day of the Dead.

Offering
for the Dead by Olga Costa
Unlike the Spaniards, who viewed death as the end of life, the
natives viewed it as the continuation of life. Instead of fearing death, they
embraced it. To them, life was a dream and only in death did they become truly
awake.

Display in the Museums Lobby

Untitled
by Oscar Soteno
Differing from the Roman Catholic imposed
ritual to commemorate All Souls’ Day, which is observed in many countries, the
custom established by pre-colonial Mexican civilizations become a ceremony
where indigenous beliefs blended with Catholic beliefs. Therefore, the Day of the Dead in Mexico is not a
mournful commemoration but a happy and colorful celebration where death takes a
lively, friendly expression.
 |
Cartoneria by Miriam Castañeda
|
 |
Frida Kahlo Skeleton by Castillo Orta F.
|
 |
| Nun, Archbishop and Nun by Alvaro de la Cruz
The Day of the Dead is
an ancestral tradition that blended with Catholicism to create a special time
and space to remember and honor the loved ones with offerings, the fragrance of the flowers, the light of the
candles, the aroma of special foods and the solemnity of prayers.
|
 |
Altar commemorating
the 200 year celebration of Mexico’s Independence
It is also a time to joke and make fun of
death through "calaveras", poetry allusive to a particular person,
generally politicians; sugar, chocolate and amaranth skulls which are given to
one another with their friend’s name so "they can eat their own
death" and special crafts allusive to different aspects of the living,
with skeletons representing daily activities.
 
Sugar Skulls by The
Mondragón Family
Today, Day of the Dead is celebrated in Mexico
and in certain parts of the United States and Central America.
It's celebrated different depending on where you
go.
In rural Mexico, people visit the cemetery where their loved ones
are buried. They decorate gravesites with marigold flowers and candles. They
bring toys for dead children and bottles of tequila to adults. They sit on
picnic blankets next to gravesites and eat the favorite food of their loved
ones.

Source: Bing Images
In the United States and in Mexico's larger cities, families build
altars in their homes, dedicating them to the dead. They surround these altars
with flowers, food and pictures of the deceased. They light candles and place
them next to the altar.
|


The Altar
The altar includes
four main elements of nature — earth, wind, water, and fire.
Earth is represented by
crop: The Mexicans believe the souls are fed by the aroma of food.
Wind is represented by
a moving object: Tissue paper is commonly used to represent wind.
Water is placed in a
container for the soul to quench its thirst after the long journey to the altar.
Fire is represented by
a wax candle: Each lit candle represents a soul, and an extra one is placed for
the forgotten soul.
 |
National
Museum of Mexican Art, 2010
I
hope you found this little post interesting, Happy Day of the Dead!
|

=Di
Sources: azcentral and DayoftheDead.com
Monday, October 24, 2011
All-Hallows-Even (evening) Party!
It's the most wonderful time of the year...

Okay, well I think so at least :)
Hi bloggers, since Halloween is my favorite time of year to plan a party,I thought I would share some of my projects and prep for them.
To get you inspired, here is a nice link to the history of Halloween:
First up, one of my favorite things to make around Halloween is chocolate suckers and all the like. This year I chose Witches and Mummies


For the Mummies, I used a foot mold, large marshmallows, white chocolate, black candy coloring, pre-made eyeballs, sucker sticks, bags and a few zip locks.
Simple steps: melt chocolate, color it to your preference or don't, your choice on what color you want your mummies to be. Let sit for a few minutes, place a six inch stick into the top of the marshmallow, dip the marshmallow in the chocolate, coating it all, then set aside to dry on wax paper. While those chill, fill a foot mold of your choice with white chocolate, place in the fridge to chill. Once the marshmallows are dry, trim the bottoms as needed. using the melted chocolate as glue, place some on the top of the feet toward the back and press the marshmallow body on to the feet. Next, use the chocolate as glue for the eyes, placing where you will see them best. Once dry (5 mins) melt more chocolate, but not too hot, move it to a zip lock bag, cut a small hole in the corner and drizzle the secondary color over the body and feet creating the mummified look. Place in a 1 pound decrotive clear bag with ribbon. (2) One pound bags of chocolate makes 12 bodies, all the feet and the drizzle need for the mummification.


These are a little more involved. Make the bodies the same as the mummies. I used light green chocolate and mixed yellow candy dye to make the mossy green. Fill the hat mold with chocolate,(dyed black), fill the witches shoes/legs with part green and part black, (see picture for sample. Once the legs are ready, drizzle orange over green legs to create socks. When the hats are done , use luster dust of your choice to accent the hats details. I used two different hats and super gold, bright orange and a shiny bright green. Add the eyes with melted chocolate, make the nose by using the end of a stick and build up the green chocolate where the nose will be, add a spec of black on the tip for a mole. Use a toothpick in red to make the mouth.Attach the legs as you would the mummie, place the stick toward the back top of the marshmallow. Next add rope licorice for hair, using the black chocolate for the hair glue. Next attach the hat to the backside of the hat, adhering it to the stick to secure. Let dry, place in clear bag and ribbon. They make great gifts!!

For the Witches: large marshmallows, witch hat and boot molds, light green, orange, red and dark chocolate melt-able chocolate, sucker sticks, bags, rope black licorice for witches hair, pre-made eyes and luster dust for painting.
Next up, the decorations! This year I am making a few things, the first thing I have already finished, my spooky pumpkin. I cut a fake carvable pumpkin in half, sprayed it in supper 77, added a layer of glitter, then used toothpicks and kebob sticks to attach some Spooky messages.

Join me for Halloween night and see what I do with this mess!


Thanks for stopping today , I hope some of my projects inspire you to get spooky and enjoy the purple, green , orange and black combo that only works this time of year!
Cheers,
Kristin
PS. Thanks to those of you for stopping by this past weekend for our blog hop Halloween Party, we appreciate you taking the time to leave us such awesome messages.
Subscribe to:
Posts (Atom)

