Saturday, February 27, 2010

Winter Cards

Julie has been up to her ears in Winter in her home state of Minnesota, so she decided to embrace it with these beautiful cards in tribute to old man Winter.


May Your Day....: Bazzill cardstock, My Minds Eye patterned paper, AC Cardstock, Stampin' Up ticket punch, paper distressor, vintage ric rac, pop up foam adhesive, brad from Oriental Trading Company.


We're Having Snow Much Fun!: AC cardstock, unknow snowflake pattern paper, Pink Paislee, Melissa Frances Rub on, Color Box ink, Vintage Simplicity pattern images, Martha Stewart Baker's Twine.


*I had fun making this Winter card. A handmade card goes a long way in the hustle and bustle of life to show someone that you have really thought about them. It might make their day! I love Vintage patterns so when I saw these Winter cuties, I knew I needed to use them. I tore the Pink Paislee paper to try and add a bit of "snow hills" to the card. I made the little boy slide down the hill! I wanted some snowflakes on the card, but I wasn't liking any of my punches. So, I decided to stitch them on using Martha Stewart Baker's Twine.


Thanks Julie for what I think are two of my favorites from you!


And thank you bloggers for stopping by today and I hope your creative ideas are flowing about Alice and her friends in Wonderland! I can't wait to see everyones creations, thanks for such a fun first Art Journal Friday prompt Gayle! To see more about Gayle's Art Journal prompt read below and don't forget to sign up for her Art Journal Group in our Scrappy Community.

Have a wonderful weekend and check back tomorrow for a calendar of our March plans, it's national craft month, so you know we are going to be keeping you busy right! We will have free project kits, a week long of kid craft ideas, Online chats, contests, challenges and more yes more giveaways, see you soon!


Don't worry, be Scrappy!

Kristin
Friday, February 26, 2010

Welcome to Art Journal Friday!

It’s the last Friday of the month - Welcome to Art Journal Friday at The Scrappy Tree!

I have just recently been brave enough to try this particular medium and I would love it if you would join me! The Scrappy Tree girls have been kind enough to me to see how enthused I am about this new form of expression and just as others have done for me, I want to share with you.

First of all I want to say quite clearly that ART JOURNALING IS FOR EVERYONE. Seriously, if I can do it, so can you. I had spent plenty of time admiring the amazing pages that the art journal experts turned out, thinking oh my GOSH I could never do that. And you know what? Maybe I never will. But it doesn’t matter! If you can put pen to paper, brush to paper, glue to paper – you can art journal. And all I’m asking of you today is one little page :) Papercraft, painting, sketching, collaging - the list is endless and it's all good!

The way that I got brave enough to try was through finding a prompt. Someone gave me a focus point to start from. It’s true to say that art journaling can be the most personal thing that you wouldn’t want to show anybody, or it can be the opportunity to try out a new technique along with a quote or a picture or a title that speaks to you in some way – speaks to you but no one else would know why you chose it.

I would love for this challenge to give you the chance to try art journaling if you never have before, because I have just started this journey myself and would love to share it! But equally, if you have been art journaling for some time and you want to take part, remember it’s an inspiration to others as well as every page being another step in your own journaling journey – everybody welcome!

Ok, so here’s the challenge!

Using the prompts below as inspiration, create a journal page over the weekend. If you’d like to share it with us (we would LOVE to see your pages, but if it’s too personal then we understand that too) then please either post it to the Art Journal Friday group on our Ning forum, or e-mail the image to me at thescrappytree@hotmail.com and I can post it for you. If you are taking part but don’t want to post your page, please come and leave some love! Please send your images in by Sunday of this week.

Now I ADORE Alice in the Wonderland, in particular the 1951 Disney film version – the Cheshire Cat has to be one of my favourite characters of all time! So as we start thinking about March in just a few days – the March Hare and the Mad Hatter sprang into my mind at once! – I would love to see pages with an Alice connection. A purple page in tribute to the Cheshire Cat? White bunnies for the White Rabbit? Playing cards or roses painted red for the Queen of Hearts? Do you want to celebrate your ‘unbirthday’? Have you learned a lot of things from the flowers? ;) Or in the words of the caterpillar – ‘who…are...you?’

I hope that everybody can find something that speaks to them and inspires them this weekend! Happy art journaling :) from The Scrappy Tree!

Gayle

Sunday, February 14, 2010

Happy Valentines Day !

The Scrappy Tree Team wishes all you bloggers out there a Happy Valentines Day. To celebrate our last day of Valentines gift ideas comes another twist on a V-Day key chain.


These key chains are all made with beads from my collection including; foil hearts, wooden beads, raw turquoise and smaller glass foil beads . I used several different chain links for variety and texture adding accenting beads on headpins with spacers, end caps and jump rings as needed. Lastly attaching them with lobster clips and larger jump rings to the main key ring and it's ready for use. With an hour of your time and basic beading skills you are ready to create yourself and give to your Valentine.


Some close ups


Have a Wonderful Valentines Day! Thanks for stopping by :)


Kristin

Saturday, February 13, 2010

Day 13 - Vintage Valentine Inspiration

Firstly, thanks to everybody who shared their projects for the Inspiration Challenge with us - we thought that we would share the love as it's Valentine's weekend, and post them all here for you to see!

Just to remind you, the original prompt was Vintage Valentine and this amazing image from artandimagesbykim - thanks again Kim for allowing us to use this for our challenge!
Head over to Kim's site to sign up for membership and you can have access to loads of great free images like this one to use in your work, and in the process probably make a whole load of new friends! It's a great community site with lots of challenges :)

You might recognise this first project from Monday - a card made by TST's Julie:-

We also had projects from Diana:-
And Peggy:-
Beautiful cards ladies! Love how they are all so different. You can check them out and get some more information on the supplies used at Julie's Inspiration Challenge group on our Ning site.

And this is my attempt! For this challenge we want you to get inspired to do whatever you want with the prompt - me, I wanted to make an art journal page:-

If you've ever wanted to give art journaling a go (or even if you already are and love it!), check back on the last Friday of this month for a weekend challenge - using any medium you like (paper, paint, if you like it then use it!) we'd love to see you create a page and share it with us! At The Scrappy Tree we're pretty new to art journaling, so you'll be in good company - why not try something new with us?

Thanks for looking - Julie will have another Inspiration Challenge for us on the second Monday of March, we look forward to seeing your projects!

Gayle

Thursday, February 11, 2010

Day 12 - Kids' Valentine's special!

On Day 12, let me introduce our newest guest designer, Debbie! Debbie is the daughter of TST's Julie and is just as talented as her mum! For today's post, Debbie shared with us some of the cards that she made for her classmates at school.
Debbie added the stickers to the cardstock and inked the edges, and applied flowers and added some candy.

Supplies used: K and Co. Valentine stickers, American Crafts Cardstock cut to 2.5 by 3.5 in. , Prima flowers, pink washable ink pad.

Thank you Debbie for designing for us today! I'm sure your classmates will love your cards :)

Last day today for Julie's Inspiration Challenge - post to our Ning group by midnight tonight! Thanks to everyone who's taken part so far, hope that you found it as fun as we did!

Gayle


Wednesday, February 10, 2010

Day 11 - Door hanger

Another project from the talented Julie B! This beautiful door hanger has vintage Valentine written all over it and again would make a beautiful gift or decoration.

Supplies used: Crackle Paint, an unknown chipboard heart, lace from my stash, Prima, and the Victorian sentiment from Crafty Secrets.

So tomorrow we have a very special guest designer appearing here representing a certain demographic of crafters we certainly wouldn't want to leave out for Valentine's! Check out TST tomorrow and leave some love :)

Don't forget to share your creations inspired by this month's Inspiration Challenge! If you'd like to share them with us, we have a dedicated group over on our Ning site so why not call in?

Thanks for looking - don't worry, be scrappy!

Gayle

Tuesday, February 9, 2010

Day 10 - Coupons

So for Day 10, we thought it would be fun to make a Valentine's coupon book! It can be difficult to find something to get for the man in your life - well with a coupon book you can be creative!

I wanted this to look more masculine so tried to keep it simple and not embellish too heavily - the temptation to use flowers and stickles was tremendous at times, but I resisted!

For this project I used some old playing cards and covered both sides with patterned paper, rounded the corners and then inked with Fired Brick Distress Ink. I cut out some smaller rectangles from plain cardstock, rounded the edges and inked these with Distress Ink also.

I stamped the number one in Distress Ink (using Making Memories stamps) and wrote on the coupon 'value' using a black Sharpie and a Micron pen.
I also added a stitching effect using a Uniball Stylo white pen, and the Micron black pen.

I punched one corner of each card with a Crop-a-dile, and added a red eyelet to each card, then put a double thickness of string through and knotted it to keep them all together.


As a final touch I added American Crafts letter stickers to spell out 'Love you' on the back of the cards. I may well add some more journalling to this before presenting it as a gift but you get the idea!
Supplies used: American Crafts 'Sixth Avenue' and 'Play', American Crafts Remarks letter stickers, Crop-a-dile and red eyelets, 7 playing cards, corner rounder, string, Uniball Signo white pen, black Sharpie, Micron 05 black pen, Making Memories number stamp, Fired Brick Distress Ink.


Thanks for looking! All this week we're running Julie's monthly Inspiration Challenge, so get inspired and upload here by Friday :)

Gayle

Day 9 - Banner

Today's project is this cute banner from TST's Julie - I love the bright colours! This would make a great gift for example for a bedroom, or as a decoration on Valentine's Day. Simple to make with supplies you probably have as standard in your stash, you can choose papers to coordinate with the room you intend to hang it in or even to coordinate with other decorations and gifts.

Supplies include: Paper - The Paper Studio, SEI; Thickers; Martha Stewart butterfly punch; brads and buttons from personal stash; Making Memories felt flower; gemstones - Michaels $1 section; white Signo Uniball pen; Liquid Pearls.

Thanks for looking! And thanks to Julie for another great project :) The countdown is on for Valentine's on Sunday so 5 more posts to go! Plus you can join in with Julie's Inspiration Challenge for February up until Friday - don't forget to post your project to the Ning group!

Sunday, February 7, 2010

Day 8 - Julie's Inspiration Challenge

For today's post, we want you to join in! This is Julie's monthly inspiration challenge that we ran for the first time last month and because we had a great response we want to carry on! This one is just for fun remember - take your inspiration from the prompt and get creating! Post your entry to the Inspiration Challenge group on our Ning forum by Friday and share your work with us - we want to see what you were inspired to do.


February's prompt is Vintage Valentine! For this month's prompt we were loving this beautiful vintage Valentine image from artandimagesbykim


Artandimagesbykim is a great community site which you can become a member and have access to a range of free images for your artwork, and there are a great mix of people there from all walks of crafting. They run regular challenges for members and a number of groups depending on your area of interest so why not take a look? TST are big fans :)
Our tremendous thanks to Kim for allowing us to use this image for our challenge :)


So either using this image directly in your work or using Vintage Valentine as your theme, get inspired to create something and come share it with us! This is Julie's project, inspired by the prompt:-

"Hi! Here's my card for the inspiration challenge. The image was wonderful and really had me want to make a wonderful Vintage Valentine with it!"

Supplies used: Close to My Heart cardstock and papers, Webster's Pages , Close to My Heart stickers, Glimmer Mist, Recollections gemstones, Bo Bunny flowers, Making Memories brad, Fancy Pants Designs stamp, Color Box ink, distressing tool.

This challenge will run until Friday, so share with us by uploading your picture to Julie's Inspiration Challenge group over on our Ning site. We look forward to seeing your projects!

Day 7 - Altered frame

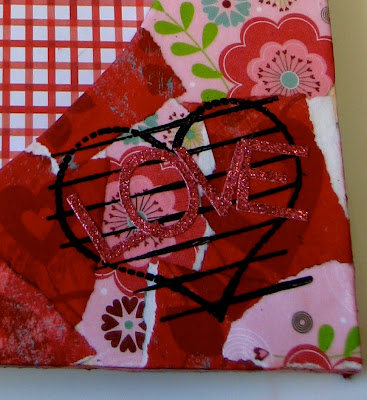
Today's Valentine project is a beautiful altered picture frame by TST's Kristin - why not make one of these and pop in a photo of you and your loved one? A gorgeous gift and a lovely keepsake :)
Supplies for the frame:- Michaels- $1.00 frame with heart shape, Mod Podge to attach papers and for clear coat, Bo Bunny 'A gift of love' papers
Supplies for the right corner embellishment:- Autumn Leaves heart-shaped journaling stamp with black StazOn and K&Co. Marcella line pink glitter letters in the word "Love"
Supplies for the heart embellishments:- UTEE (ultra thick embossing enamel), UTEE-FLEX additive, magenta color additive - all by Suze Weinberg and Ranger

"I tore the papers and attached them with Mod Podge, wrapping them around the edge of the frame. Adding a distress "red brick" ink around the outside edges of the frame to fill in for color.

I melted the UTEE and flex, added the magenta color and used heart shaped to dip into the UTEE. Once the stamp was covered in UTEE, stamp a non stick surface with pressure and wait till cooled. Once cooled, separate the stamp from the UTEE and use as desired. I ended up cutting the inside heart of the stamp and placed the excess back into the melting pot to melt and reuse.
*Rubber stamps are recommended, acrylic can melt*

Once I had the hearts cut out, I used a quickie glue pen to glue the inside of the heart and added Martha Stewart glitter for shimmer. I simply attached the hearts to the frame with Aleene's quick dry tacky glue.

Last step, ink the inside of the heart of the frame to even out the color and to cover up any places missed by paper."


Add a picture and you're done! Thanks Kristin for sharing your project as well as a new technique - I certainly want to give UTEE a go now!

Today is the last day to order yourself a Scrappy Tree candygram in time for Valentine's, so if you want one grab it today while you can! We can add a personalised message and send straight to your Valentine, or if you prefer send directly to you for you to add your own message. Click here to go straight to our Etsy shop.

We'll be back tomorrow with Julie's inspiration challenge, which will run from Monday to Friday of this week,so remember to call in if you want to play along! Thanks for looking :) don't worry, be scrappy!

Saturday, February 6, 2010

Day 6 - Cupcakes

For today's post we thought we'd get creative in the kitchen! Cupcakes have become really popular and as a result you can get them in pretty much any flavour you like. The ones that caught my eye were these red velvet cupcakes, which came out really moist and quite chocolatey - yum!

The icing I used was butter icing rather than the icing given in the recipe, but you could use whatever you like that would suit the chocolate flavour of the sponge.
Simply bake, ice and then decorate with cocoa powder, chocolate sprinkles, chocolate drops - whatever your favourite toppings are! Obviously I like chocolate :) The cupcake sponge has a beautiful deep red colour (hence the name!) which I thought was quite fitting for Valentine's Day.
Why not bake up some cupcakes for your Valentine? Pop them in a small box and tie up with ribbon, or serve them up on Valentine's Day weekend as a treat to share. Thanks for looking!

Tomorrow is the last day to order a candy gram in time for Valentine's Day on the 14th, so visit the Etsy store soon!

Gayle

Thursday, February 4, 2010

Day 5 - Trinket boxes

It's day 5 of February fun (try saying that quickly!) and today we have for your perusal these darling little trinket boxes! These make a great gift wrap with a difference, or you could even give them as a gift in their own right - beautiful job Julie!
Supplies used for jewellery trinket box: box from Hobby Lobby, Crackle paint, Colorbox ink, lace from personal supply, jewellery brooch from personal stash, pearls from Kaisercraft


Supplies used for flower trinket box: box from Hobby Lobby, Crackle paint, Colorbox ink, 7 Gypsies tag, Prima flower


'To make the jewellery trinket box I simply painted the plain box from Hobby Lobby and allowed it to dry before adhering anything to it. Then I inked the edges of the box once the paint was dry. I used a hot glue gun to adhere the small lace trim and then applied to pearls to it. I bunched the lace haphazardly and pinned the broach to it. I glued a sheer ribbon on top of the box before gluing the lace and brooch on.

The flower trinket box was decorated in a similar way.

This is a simple, yet pretty way to make a little treasure box for someone special!'

Thanks for joining us for another day of February fun! We've got another 9 days lined up so hopefully there will be a little inspiration for everyone :) And don't forget to pick up a candy gram by Sunday for your Valentine! :)

Gayle

Wednesday, February 3, 2010

Day 4 - Keyrings

Day 4 of our Valentine gift ideas! Why not give your loved one a Valentine gift to keep all year round? These cute little keyrings are really simple to make!

1. stamp a heart shaped image onto grungeboard using StazOn ink and cut out, and repeat.
2. colour in with Fired Brick Distress ink and stick the two pieces back to back using a strong glue like Glossy Accents (it can help to press this inside an old book to keep it flat while it dries).
3. go around the edges of the heart with a Sharpie (red or black) to cover any edges showing
4. paint all over with sparkle mod podge
5. punch a hole in one corner and thread through a swivel key chain - voila!

Now I tried taking photos from every angle to show how sparkly these came out... but the photos just don't cut it so try it yourself! :)

And if you love home made gifts, you'll love these handmade candy grams for Valentine's day! Check them out here - order by Sunday for delivery in time for Valentine's Day.

Gayle


Tuesday, February 2, 2010

Day 3 - Mini-album

On day 3 of our Valentine projects - our mini-album expert returns! Julie made this fantastic mini-album as a gift, which can easily be completed by the lucky recipient with their own pictures and journalling. If you have a few coasters handy why not have a go at this coaster album :)


Supplies : Coasters from Michael's $1 section, papers (Pink Paislee, SEI), white uniball pen, acrylic from Fancy Pants Designs, Marvy punch, Webster's Pages letter stickers, Thickers, rub-on on back cover from Kaiser Kraft.

Thanks Julie! Gorgeous project :) Check back tomorrow for more February fun with TST!

Monday, February 1, 2010

Day 2 - Peppermint hearts

Day 2 of your Valentine's projects - peppermint hearts! This is a peppermint creme recipe slightly modified to make it a little bit Valentine's; they're scrummy anyways so give them a try! Easy to make and no baking required.


So here's the recipe!

450g/1lb icing sugar
50g/2oz butter, melted
2 tablespoons lukewarm milk
1 teaspoon peppermint essence
1 teaspoon red food colouring
extra sifted icing sugar (for rolling out)


1. Sift icing sugar into a bowl.
2. Combine melted butter with milk, peppermint essence and red food colouring
3. Add milk mixture gradually to icing sugar and mix well. Turn out onto board dusted with sifted icing sugar. Roll out to about 1/4cm / 1/8inch thickness
4. Cut into heart shapes using a small heart shaped biscuit cutter
5. Leave in the cool until firm


These remind me of making sweets with my mum when I was little! They've been different shapes and colours over the years - have fun making them! They can make a sweet dish of candies to share, or dress them up by putting a few into a small box or cellophane bag and decorate with ribbon for a cute and simple gift.


Don't forget that The Scrappy Tree candygrams are only available until Sunday this week (to allow time for shipping), so if you want to say happy Valentine's with a handmade gift from the heart, check out our Etsy shop today!


Thanks for looking :)


Gayle